 |
|||
|
|
|||
|
Page Title:
ATTENUATOR ASSEMBLY A6AT1 REPLACEMENT |
|
||
| ||||||||||
|
|
 TM 11-6625-2975-40
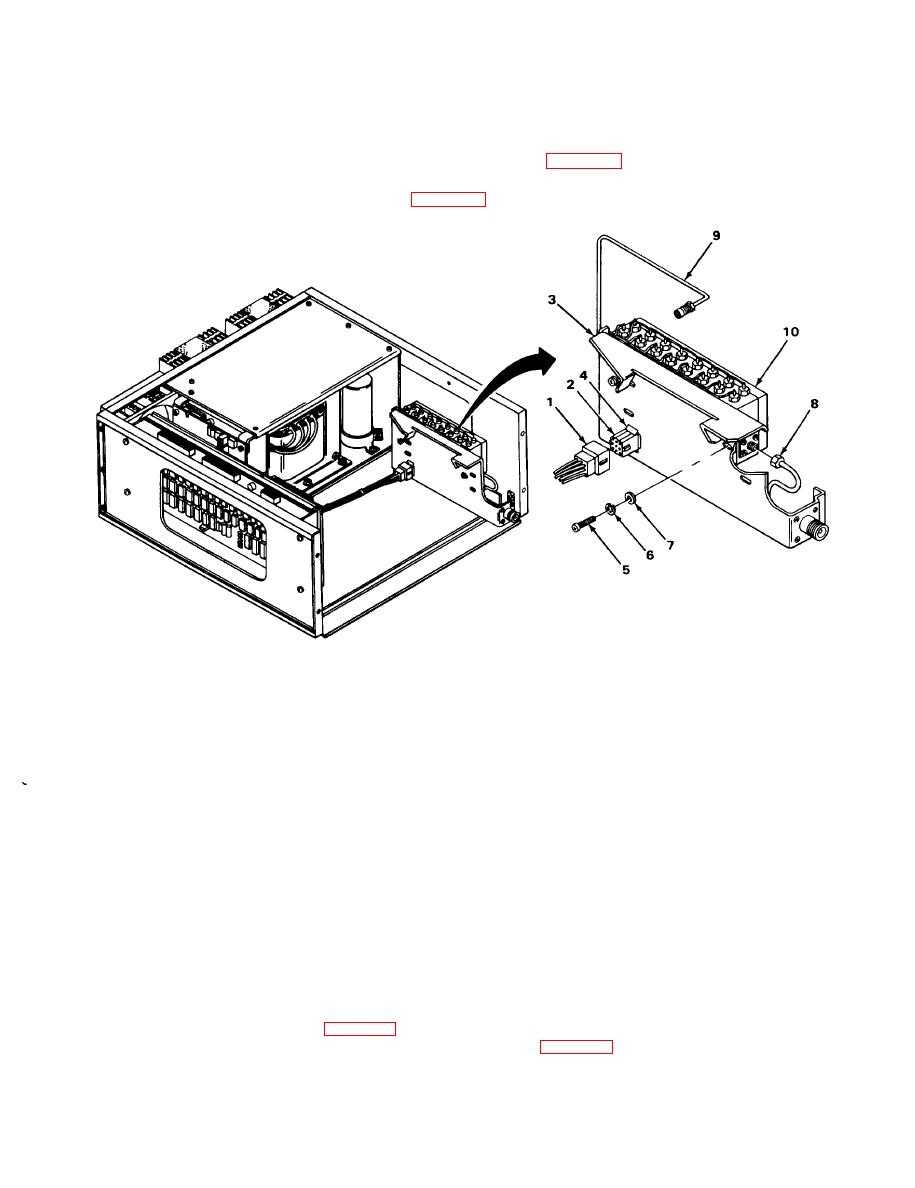
A6AT1 REPLACEMENT.
MATERIALS/PARTS: Attenuator, digital control, assembly A6AT1 (PN PA588SMA)
PRELIMINARY PROCEDURE: Remove front panel assembly A1 (para 2-29).
Remove rf modulator assembly A3 and synthesizer
assembly A4 (para 2-33).
EL9LY044
REMOVAL
1.
Disconnect connector P7 (1) from connector (2) on A6AT1 bracket (3).
2.
Push down top lock tab (4) of connector (2) and push connector through hole.
3.
Remove two screws (5), Iockwashers (6), and flat washers (7).
4.
Disconnect rf output cable (8) and coaxial cable (9).
5.
Remove A6AT1 assembly (10).
INSTALLATION
1. Push connector (2) through hole in A6AT1 bracket (3) until both lock tabs are pushed through
hole.
2. Position A6AT1 assembly (10) on A6AT1 bracket (3).
3. Connect coaxial cable (9) and rf output cable (8) to A6AT1 assembly (10).
4. Install two screws (5), Iockwashers (6), and flat washers (7).
5. Connect connector P7 (1) to connector (2) on A6AT1 bracket (3).
FOLLOW-ON MAINTENANCE: Install rf modulator assembly A3 and synthesizer assembly A4
Install front panel assembly A1 (para 2-29).
|
|
Privacy Statement - Press Release - Copyright Information. - Contact Us |