 |
|||
|
|
|||
|
Page Title:
BATTERY CHARGER CONVERSION TO 230 VAC OPERATION. |
|
||
| ||||||||||
|
|
 TM 11-6625-2976-40
2-33. FRONT PANEL REPLACEMENT. (CONT)
INSTALLATION
Install two handles and secure with two screws each.
1.
Install rotary switch S7, S11, and S17 (para 2-32).
2.
Install pushbutton switch S3, S4, and S5 (para 2-30).
3.
Install Indicator light DS1, DS2, and DS3 (para 2-29).
4.
Install connector J2 (para 2-28).
5.
Install pushbutton switch S23, S24, and S25 (para 2-27).
6.
Install toggle switch S1, S2, S6, S10, S12, S15, S16, S18, S21, and S22 (para 2-26).
7.
Install pushbutton switch S8,S9,S13, S14, S19, and S20 (para 2-25).
8.
Install battery case (para 2-23).
9.
Install attenuator switch AT1 and AT2 (para 2-22).
10.
Install antenna jack J1 and J3 (para 2-21).
11.
Install A6 and A8 assembly (para 2-19).
12.
FOLL OW-ON MAINTENANCE: Install electronic components assembly (para 2-17).
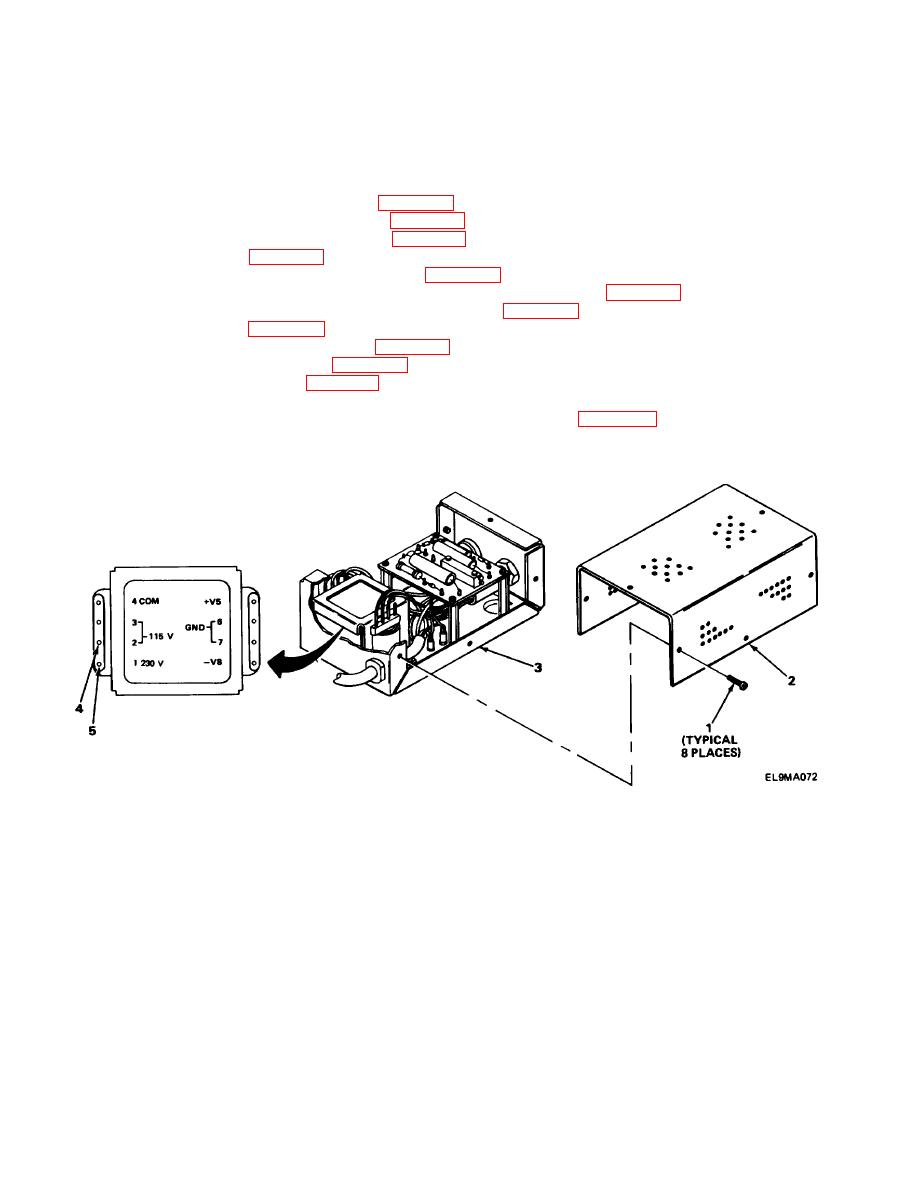
2-34. BATTERY CHARGER CONVERSION TO 230 VAC OPERATION.
Remove eight screws (1) from battery charger cover (2).
1.
2. Remove battery charger cover (2) from battery charger (3).
3. Unsolder wire from transformer (115 v) input 2 (4) and solder to transformer (230 v)
input 1 (5).
4. Position battery charger cover (2) on battery charger (3) and secure with eight screws (1).
2.35. PAINTING.
Refer to TB 43-0118 for painting and touch up instructions.
2-36. PLACING IN SERVICE.
Before returning the test set to service, perform the calibration procedures in TB 9-6625-2052-35.
2-80
|
|
Privacy Statement - Press Release - Copyright Information. - Contact Us |